

The most common cause of bathroom flooring failure isn't the material itself; it's a subfloor that fails the 4mm flatness tolerance required by British Standards. You've likely chosen Stone Plastic Composite because it's rigid, waterproof, and durable, yet the success of your project rests entirely on the precision of the setup. Learning how to fit SPC click flooring correctly involves more than just snapping planks together. It requires a meticulous approach to subfloor preparation, moisture testing, and perimeter sealing to ensure a lifetime of performance.
We recognise the common frustrations of home renovation, from the fear of water seeping under the planks to the complexity of cutting around toilet wastes. You deserve a floor that is level, stylish, and stable. This expert-led guide provides the technical clarity needed to install your flooring to a professional standard, covering everything from the essential 48-hour acclimatisation period to managing expansion gaps in humid environments. We will preview the tools required, the step-by-step methodology, and the distinct advantages of choosing a comprehensive supply and install service to guarantee a flawless finish that meets every manufacturer warranty.
Key Takeaways
- Understand why SPC flooring is the superior, waterproof, and stable choice for modern high-moisture British bathrooms.
- Master the technical steps of how to fit SPC click flooring, from mandatory 48-hour acclimatisation to precise subfloor levelling.
- Learn to manage expansion gaps and perimeter seals to ensure your installation remains durable, compliant, and professional.
- Discover how a "supply and fit" model provides a convenient, reliable, and guaranteed solution for local home improvements.
- Identify the essential toolkit and layout strategies needed to navigate intricate plumbing and achieve a flawless, level finish.
Understanding SPC Click Flooring for UK Bathrooms
SPC flooring is the definitive choice for modern UK bathroom renovations. It stands for Stone Plastic Composite, a rigid, limestone-based material that provides unparalleled structural integrity. While it shares some DNA with traditional Vinyl composition tile (VCT), SPC is engineered for extreme durability. It's 100% waterproof. It's stable. It's resilient. This makes it far superior to laminate, which often swells in humid environments, or flexible LVT, which can mirror every lump in your subfloor.
The core of the system is the tongue-and-groove click mechanism. This design allows the planks to interlock securely, creating a floating floor that doesn't require messy adhesives. When you're learning how to fit SPC click flooring, you'll find that this mechanical bond is what provides the watertight seal and professional finish homeowners expect. It handles temperature fluctuations from underfloor heating with ease, maintaining its shape whilst other materials might buckle or gap. Understanding this mechanism is the first step in mastering how to fit SPC click flooring in complex spaces like alcoves or around pedestals.
The Anatomy of an SPC Plank
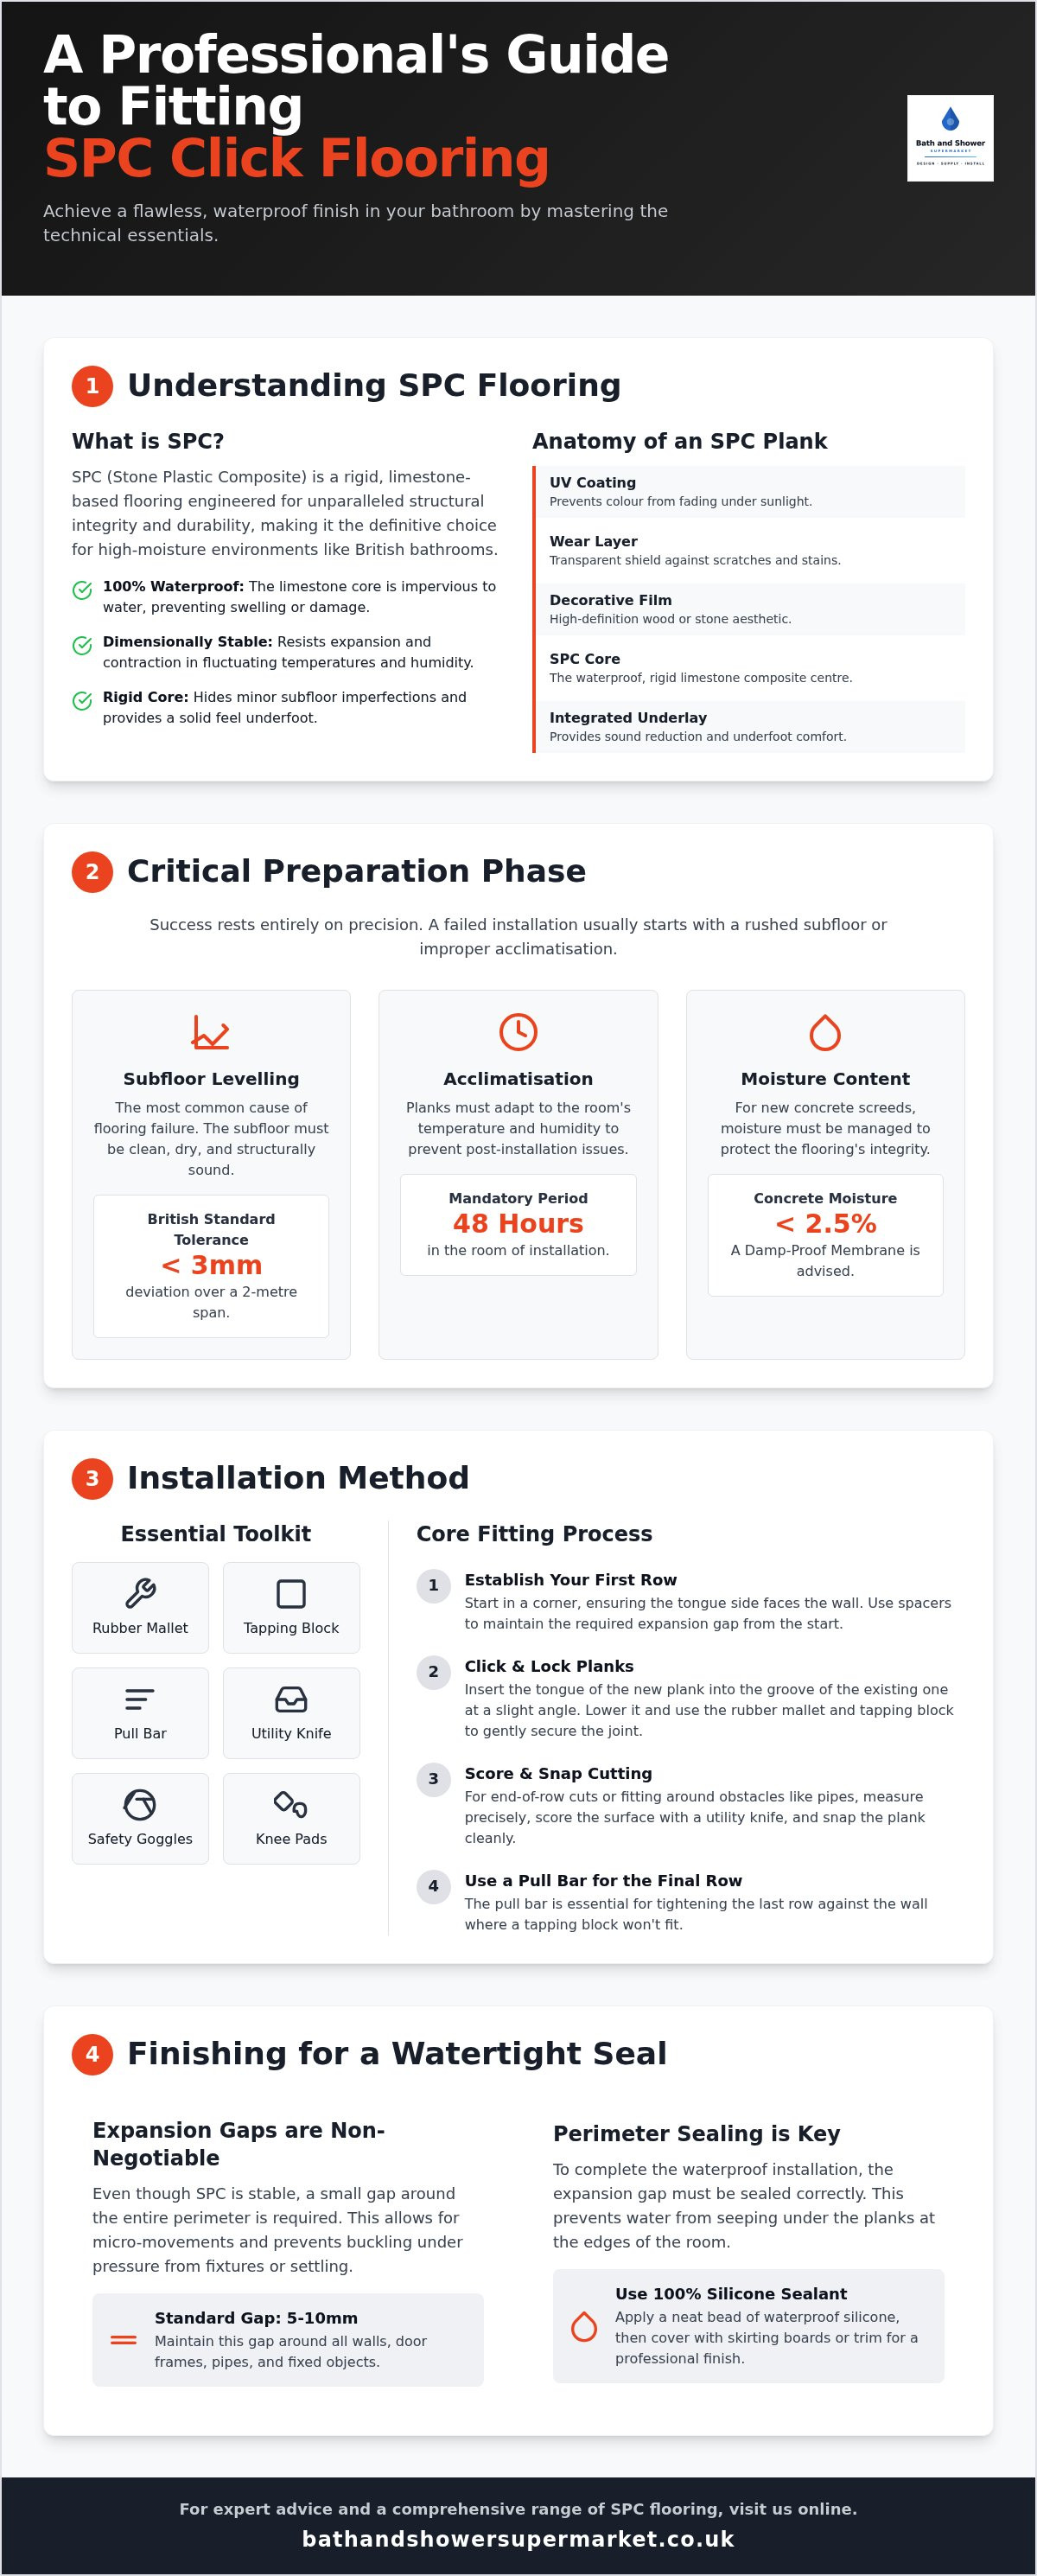
An SPC plank is a multi-layered piece of engineering. Each layer serves a specific functional purpose to ensure longevity in a wetroom or bathroom environment:
- UV Coating: Prevents the decorative layer from fading under direct sunlight from bathroom windows.
- Wear Layer: A transparent shield that resists scratches, stains, and daily foot traffic.
- Decorative Film: Provides the high-definition aesthetic of wood or stone finishes.
- SPC Core: The limestone and PVC composite that gives the board its rigid, waterproof properties.
- Integrated Underlay: Most premium boards include a pre-attached IXPE or EVA backing for sound reduction and comfort underfoot.
Why Rigid Core Matters in the Bathroom
Dimensional stability is the primary benefit of a rigid core. In a bathroom, where humidity levels spike daily, wood-based products expand and contract. SPC doesn't. This stability allows for a more consistent installation across large areas. It also provides a solid foundation for heavy fixtures. If you're installing a comfort height toilet, you need a floor that won't flex or compress under the weight. SPC provides that industrial-grade strength whilst hiding minor subfloor imperfections that would ruin a thinner, more flexible vinyl. Whilst many homeowners consider a DIY approach, the precision required for a watertight finish often benefits from a professional "supply and fit" service to guarantee the material performs as intended.
Essential Preparation: Subfloors, Tools, and Acclimatisation
Preparation is the most critical phase of any flooring project. A failed installation usually starts with a rushed subfloor. Before you begin learning how to fit SPC click flooring, you must ensure your environment is controlled and your surfaces are pristine. This isn't just about cleaning; it's about structural integrity. Your subfloor must be level, dry, and structurally sound. We require a flatness tolerance of within 3mm over a 2-metre span. Any deviation beyond this can cause the click joints to flex, creak, or eventually snap under the weight of bathroom fixtures.
Safety is equally paramount. You'll be working at floor level and handling sharp materials. Equip yourself with heavy-duty knee pads, safety goggles, and cut-resistant gloves. The professional toolkit for this job is specific. You will need a rubber mallet, a tapping block, a pull bar, and a high-quality utility knife for score-and-snap cutting. Having the right equipment ensures the installation is efficient, precise, and professional. If this technical setup feels daunting, our professional installation service provides a seamless, "done-for-you" alternative that handles every logistical detail.
Preparing Different Subfloor Types
Concrete screeds are common in modern British homes but require strict moisture management. For new concrete, the moisture content must be below 2.5%. We always recommend using a damp-proof membrane (DPM) to prevent rising damp from compromising the adhesive-free bond. If you're fitting over existing ceramic tiles, you don't necessarily need to remove them. However, you must ensure they are securely bonded and that any grout lines don't create significant dips. For timber or chipboard subfloors, check for "bounce" or movement. Secure any loose boards with countersunk screws to create a rigid, silent foundation for your new SPC planks.
The Acclimatisation Process
Acclimatising your SPC flooring is mandatory. You must store the unopened boxes in the room of installation for a minimum of 48 hours. This allows the limestone-PVC core to reach thermal equilibrium with the environment. If you are installing over underfloor heating, extend this period to 72 hours. Follow these storage rules for a successful result:
- Store Flat: Never lean boxes against walls; they must lie flat to prevent bowing.
- Stacking: Keep stacks small (no more than five boxes high) to ensure even temperature distribution.
- Temperature Control: Maintain a consistent room temperature between 18°C and 25°C throughout the process.
Skipping this step is a high-risk strategy. Planks that aren't acclimatised may expand or contract post-installation, leading to joint failure or unsightly warping. When you master how to fit SPC click flooring, you realise that patience during the preparation phase is what separates a DIY attempt from a professional-grade finish.
Step-by-Step: How to Fit SPC Click Flooring
Once the preparation phase is finished, the physical installation begins. Knowing how to fit SPC click flooring correctly starts with a calculated layout. Measure the width of your room and divide it by the width of a single plank. If your calculation shows the final row will be less than 50mm wide, you must trim the first row to compensate. This ensures the floor remains symmetrical and prevents weak, narrow slivers at the edges. A balanced layout is a clear indicator of professional craft and structural foresight.
Begin in the left-hand corner of the room. Place the first plank with the tongue side facing the wall. You must insert spacers at regular intervals to maintain a consistent 5-10mm expansion gap. This gap is non-negotiable. It allows the floor to breathe and move naturally without buckling. Continue the row by clicking the end joints together. For all cuts, use the score and snap method. Use a utility knife and a steel square to score the decorative film firmly, then snap the plank over a straight edge. It's clean, fast, and dust-free.
Setting the Foundation: The First Three Rows
The first three rows are the most important. They dictate the alignment of the entire project. If these rows aren't perfectly straight, the floor will drift diagonally as you progress. Always stagger your end joints by at least 300mm. This staggering provides the structural integrity required for high-traffic areas like bathrooms. Use the off-cut from the end of the first row to start the second row, provided it's at least 30cm long. This technique minimises waste whilst ensuring a professional, staggered aesthetic that mirrors traditional hardwood.
Locking and Sealing Joints
To engage the long side of a plank, hold it at a 45-degree angle. Insert the tongue into the groove of the previous row and press down firmly. You'll feel and hear the click as it locks. Use a tapping block and a rubber mallet to close any hairline gaps. Apply gentle, repetitive strikes rather than one heavy blow to seat the joint gradually. Never strike the plank directly; the tapping block protects the delicate click profile from impact damage. In tight spaces against the wall, use a pull bar to lock the final plank into place. Perform a visual check after every piece. A seamless, gap-free surface is essential for a waterproof finish that meets manufacturer standards and ensures longevity.
Finishing Your Floor: Expansion Gaps, Skirting, and Seals
Once the final plank is locked into place, the installation enters its most delicate phase. You must remove all spacers and inspect the perimeter expansion gap. This void is essential for the floor's natural movement, but in a bathroom, it must be finished with technical precision to prevent water damage. A professional finish ensures the floor remains stable whilst looking like a permanent feature of the home's architecture. Learning how to fit SPC click flooring is only half the battle; the final 5% of the job determines the longevity of the entire project.
Fitting Around Bathroom Obstacles
Intricate cuts around toilet bases and pedestal basins are where many DIY projects falter. We recommend using a paper template to trace the exact contour of the fixture onto the plank before cutting. For radiator pipes or towel radiators, a hole saw provides a much cleaner, circular finish than a utility knife. You must leave a small expansion gap around the pipe, which can then be covered with a matching pipe rose for a tidy appearance.
Integration with existing fixtures like low profile shower trays requires a specific approach. The flooring should run up to the tray with the standard 5-10mm expansion gap. This gap is then filled with a high-grade flexible sealant rather than covered with a trim. This prevents water ingress whilst allowing the floor to expand and contract without putting pressure on the shower tray itself.
Waterproofing the Perimeter
Whilst SPC is 100% waterproof, the subfloor beneath it is often susceptible to moisture damage. In a wet environment, a floating floor needs a flexible silicone seal around the entire perimeter. Apply a neat bead of 100% anti-fungal silicone between the flooring and the wall or skirting. This prevents mould growth and stops accidental spills from seeping into the expansion void, protecting your home's structural integrity.
Finally, install your skirting boards or moisture-resistant scotia trims. You must fix these directly to the wall rather than the planks to maintain the floating nature of the system. If the skirting is already in place, a matching scotia trim provides a neat cover for the expansion void. Finish the doorway with a matching transition strip or threshold. This creates a seamless, safe bridge between the bathroom and the hallway. Achieving this level of detail is the hallmark of a professional job. For those who prefer a guaranteed, watertight result, our expert installation team handles the entire process from supply to final seal.
Professional Installation: Ensuring a Watertight, Guaranteed Finish
Whilst the previous sections detail the technical steps of how to fit SPC click flooring, the distance between a functional floor and a professional masterpiece is measured in experience. Achieving a showroom finish in a British bathroom requires more than just following a guide. It requires an understanding of structural nuances and local moisture conditions. Our "supply and fit" service model is designed to bridge this gap. By choosing a single provider for both the material and the physical setup, you eliminate the logistical friction of coordinating multiple contractors. It's an efficient, reliable, and grounded approach to home improvement.
This "done-for-you" solution provides peace of mind that a DIY project simply cannot match. Professional installation ensures that your floor meets the rigorous benchmarks set out in BS 8203:2017, the British Standard for resilient floor coverings. This is particularly important for protecting your investment. Many manufacturers require documented proof of professional subfloor preparation and moisture testing to honour their long-term warranties. A DIY attempt, whilst well-intentioned, risks voiding these protections if the subfloor fails the 4mm flatness tolerance or if residual moisture causes joint instability over time.
Integrating your new flooring with wider upgrades is a core benefit of our comprehensive service. We don't just lay planks; we ensure the entire room works in harmony. This includes the precise re-seating of Scudo Bathroom Furniture or the installation of Kartell Bathroom Furniture atop a perfectly level surface. We manage the delicate interface between your flooring and fixtures like shower trays and pedestals, ensuring every seal is watertight and every transition is seamless. This holistic approach guarantees that your bathroom remains a high-performance environment for years to come.
Technical Execution and Expert Logistics
Our professional fitters handle the heavy lifting of technical execution. This includes complex subfloor levelling using advanced compounds and the application of liquid damp-proof membranes where necessary. The speed of a professional team is also a significant factor. A project that might take a DIYer several days of trial and error is typically completed by our experts in a single day. This efficiency minimizes disruption to your home. We also ensure that all plumbing is correctly re-seated and tested, preventing the hidden leaks that often plague amateur installations. When you understand how to fit SPC click flooring at a professional level, you realise that preparation and plumbing are just as important as the planks themselves.
Book Your Professional Bathroom Installation
Choosing a local, reliable provider means you get national-standard quality with the accountability of a community-based business. Accessing our installation services is a straightforward process designed to save you time and stress. We provide a curated experience that guides you from material selection through to the final silicone bead. Our team understands the specific architectural needs of local homes and provides solutions that are both stylish and durable. Contact us today for a comprehensive quote on your bathroom flooring and furniture. Let us handle the technical details so you can enjoy a durable, professional, and guaranteed finish.
Secure Your Professional Bathroom Transformation
Mastering the technical requirements of a bathroom renovation ensures your home remains protected, stylish, and functional. We have detailed the essential phases of how to fit SPC click flooring, from the mandatory 48-hour acclimatisation period to the precision required for perimeter sealing. A successful installation relies on three non-negotiable pillars: meticulous subfloor preparation, disciplined expansion gap management, and high-grade waterproofing.
Whilst a DIY approach is possible, the complexities of plumbing integration and warranty compliance often favour an expert touch. As an authorised UK retailer, we provide a comprehensive supply and fit service that removes the stress of technical execution. You deserve the peace of mind that comes from a professional, watertight finish that meets the highest British Standards. Our team handles everything from logistics to the final silicone bead, ensuring your new floor is durable, level, and guaranteed.
Book your professional SPC flooring installation today and transform your space with absolute confidence. Your ideal bathroom improvement is just a consultation away.
Frequently Asked Questions
Do I need underlay for SPC click flooring in a bathroom?
Most premium SPC planks feature a pre-attached IXPE or EVA underlay. If your chosen product includes this, you must not install a separate underlay, as the double layer causes excessive bounce and leads to joint failure. If your planks are bare, use a high-density underlay specifically designed for rigid core flooring. Our professional fitters can advise on the best combination for your specific subfloor during a site survey.
Can I fit SPC flooring over existing bathroom tiles?
Yes, fitting SPC over existing ceramic or porcelain tiles is possible if the surface is level and secure. Any grout lines wider than 4mm should be filled with a suitable levelling compound to prevent the rigid core from bridging gaps. This approach saves time on demolition whilst maintaining a professional finish. Ensure the tiles are cleaned thoroughly to remove any soap scum or residue before you start the installation process.
How long should SPC flooring acclimatise in a UK home?
You must allow your flooring to acclimatise for at least 48 hours in the room where it will be installed. If you have underfloor heating, extend this period to 72 hours. This process ensures the limestone-PVC core reaches the ambient temperature of your home. Skipping this step is a leading cause of post-installation warping and joint separation in UK bathrooms, as the material needs time to reach thermal equilibrium.
Is SPC flooring slippery when wet in a bathroom environment?
High-quality SPC flooring typically carries an R10 slip-resistance rating. This makes it safer for wet environments than traditional laminate or polished tiles. Whilst no surface is entirely slip-proof when saturated, the textured wear layer provides essential grip underfoot. This is a key reason why many homeowners choose our professional "supply and fit" service for their family bathrooms, ensuring a safe and durable result for the household.
How do I cut SPC flooring around a toilet or pedestal basin?
The most effective method involves creating a paper template of the fixture's footprint. Transfer this shape onto the plank and use a jigsaw with a fine-toothed blade for the curved cuts. When learning how to fit SPC click flooring, remember to leave a small expansion gap around the fixture. You can then seal this void with 100% anti-fungal silicone to maintain a watertight finish and protect the subfloor from moisture.
Do I really need an expansion gap for SPC flooring in a small bathroom?
An expansion gap of 5-10mm is mandatory regardless of the bathroom's size. Although SPC is dimensionally stable, the surrounding walls and subfloor will move slightly with seasonal temperature changes. Without this gap, the floor has no room to breathe and may buckle or lift. Our professional installation team uses dedicated spacers to ensure this gap remains consistent around the entire perimeter, including doorways and obstacles.
Can I use SPC click flooring with underfloor heating?
SPC click flooring is highly compatible with both electric and water-based underfloor heating systems. The limestone core provides excellent thermal conductivity, heating up quickly and retaining warmth efficiently. However, you must ensure the floor's surface temperature never exceeds 27°C. Always consult the manufacturer's guidelines and use a floor sensor to maintain a safe and consistent heat level that protects the integrity of the planks.
What is the best way to clean and maintain SPC bathroom flooring?
Use a pH-neutral floor cleaner and a damp microfibre mop for daily maintenance. Avoid using steam mops, bleach, or abrasive chemicals, as these can degrade the UV coating and wear layer over time. For the best results, sweep or vacuum with a soft brush attachment first to remove grit. This simple routine keeps your professional installation looking pristine for its entire lifespan and prevents minor scratches from dulling the finish.


